图+源码,读懂View的Draw方法
持续创作,加速成长!这是我参与「掘金日新计划 · 10 月更文挑战」的第16天,点击查看活动详情
读懂 View 三大绘制方法的文章
图+源码,读懂View的MeasureSpec - 掘金 (juejin.cn)
图+源码,读懂View的Measure方法 - 掘金 (juejin.cn)
前置知识
- 有Android开发基础
- 了解 View 体系
- 了解 View 的
Measure和Layout方法
前言
在上一篇文章中,笔者带大家学习了 View 的 Layout 流程。这个流程很简单,当程序进到 layout() 方法,执行 setFrame() 和重写的 onLayout() 方法,使用 onLayout() 方法继续遍历其余子元素,就可以找出 View 树所有元素的位置。
本文将继续讲述 View 绘制三大方法的最后一个方法——Draw 方法。该方法不会很复杂,相信大家很快可以弄懂。
Draw 方法的作用和入口
Draw 翻译为绘画。其方法的作用是绘制界面,是 View 绘制流程的最后一步。
我们依旧和上文一样,先来看一下该方法的入口是什么,从入口到 draw 方法又是怎么样的一个流程?
第一步依旧是在 ViewRootImpl 的类中找到 performTraversals() 方法,该方法调用的第三个重要的绘制方法就是 performDraw() 。关于这一点,大家感兴趣的话,可以到 图+源码,读懂View的Measure方法 - 掘金 (juejin.cn) 一文查看。 performDraw() 是 draw 方法的入口处,文章这一部分将讲述从 performDraw() 到 View 中 draw() 方法的流程。
首先,我们进入 performDraw() 方法,这里可以看到在下面代码的注释1处,调用了一个该类下的 draw() 方法。但是很显然,这个 boolean 类型的 draw() 方法并非我们所需要的 View 下面的 draw() 方法。
private boolean performDraw() {
    ...

    try {
        boolean canUseAsync = draw(fullRedrawNeeded, usingAsyncReport && mSyncBuffer);//1
        ...
    } finally {
        mIsDrawing = false;
        Trace.traceEnd(Trace.TRACE_TAG_VIEW);
    }
	...
    return true;
}
继续在 ViewRootImpl 类下的查看这个 boolean 类型的 draw() 方法。我们忽略一些无关的代码,可以在下方的注释1处看到其调用了一个 drawSoftware() 方法。事实上,这个方法是和 View 中的 draw() 方法有关系的,我们继续往下边查看。
private boolean draw(boolean fullRedrawNeeded, boolean forceDraw) {
    ...
    if (!dirty.isEmpty() || mIsAnimating || accessibilityFocusDirty) {
        if (isHardwareEnabled()) {
            ...
        } else {
            ...

            if (!drawSoftware(surface, mAttachInfo, xOffset, yOffset,
                              scalingRequired, dirty, surfaceInsets)) {//1
                return false;
            }
        }
    }
    ...
    return useAsyncReport;
}
再次点击进去 drawSoftware() 方法查看,我们终于在下面注释2处,看到了 mView.draw(canvas) 字段。可见,View 中的 draw() 方法是在此处被调用的。由此,我们终于看到了 draw 流程的入口。
/**
 * @return true if drawing was successful, false if an error occurred
 */
private boolean drawSoftware(Surface surface, AttachInfo attachInfo, int xoff, int yoff,
                             boolean scalingRequired, Rect dirty, Rect surfaceInsets) {
    ...
    try {
        ...
        mView.draw(canvas);//2
        drawAccessibilityFocusedDrawableIfNeeded(canvas);
    } finally {
        ...
    }
    return true;
}
上面的流程,我们可以用一张图来展示,希望对你的理解有帮助。
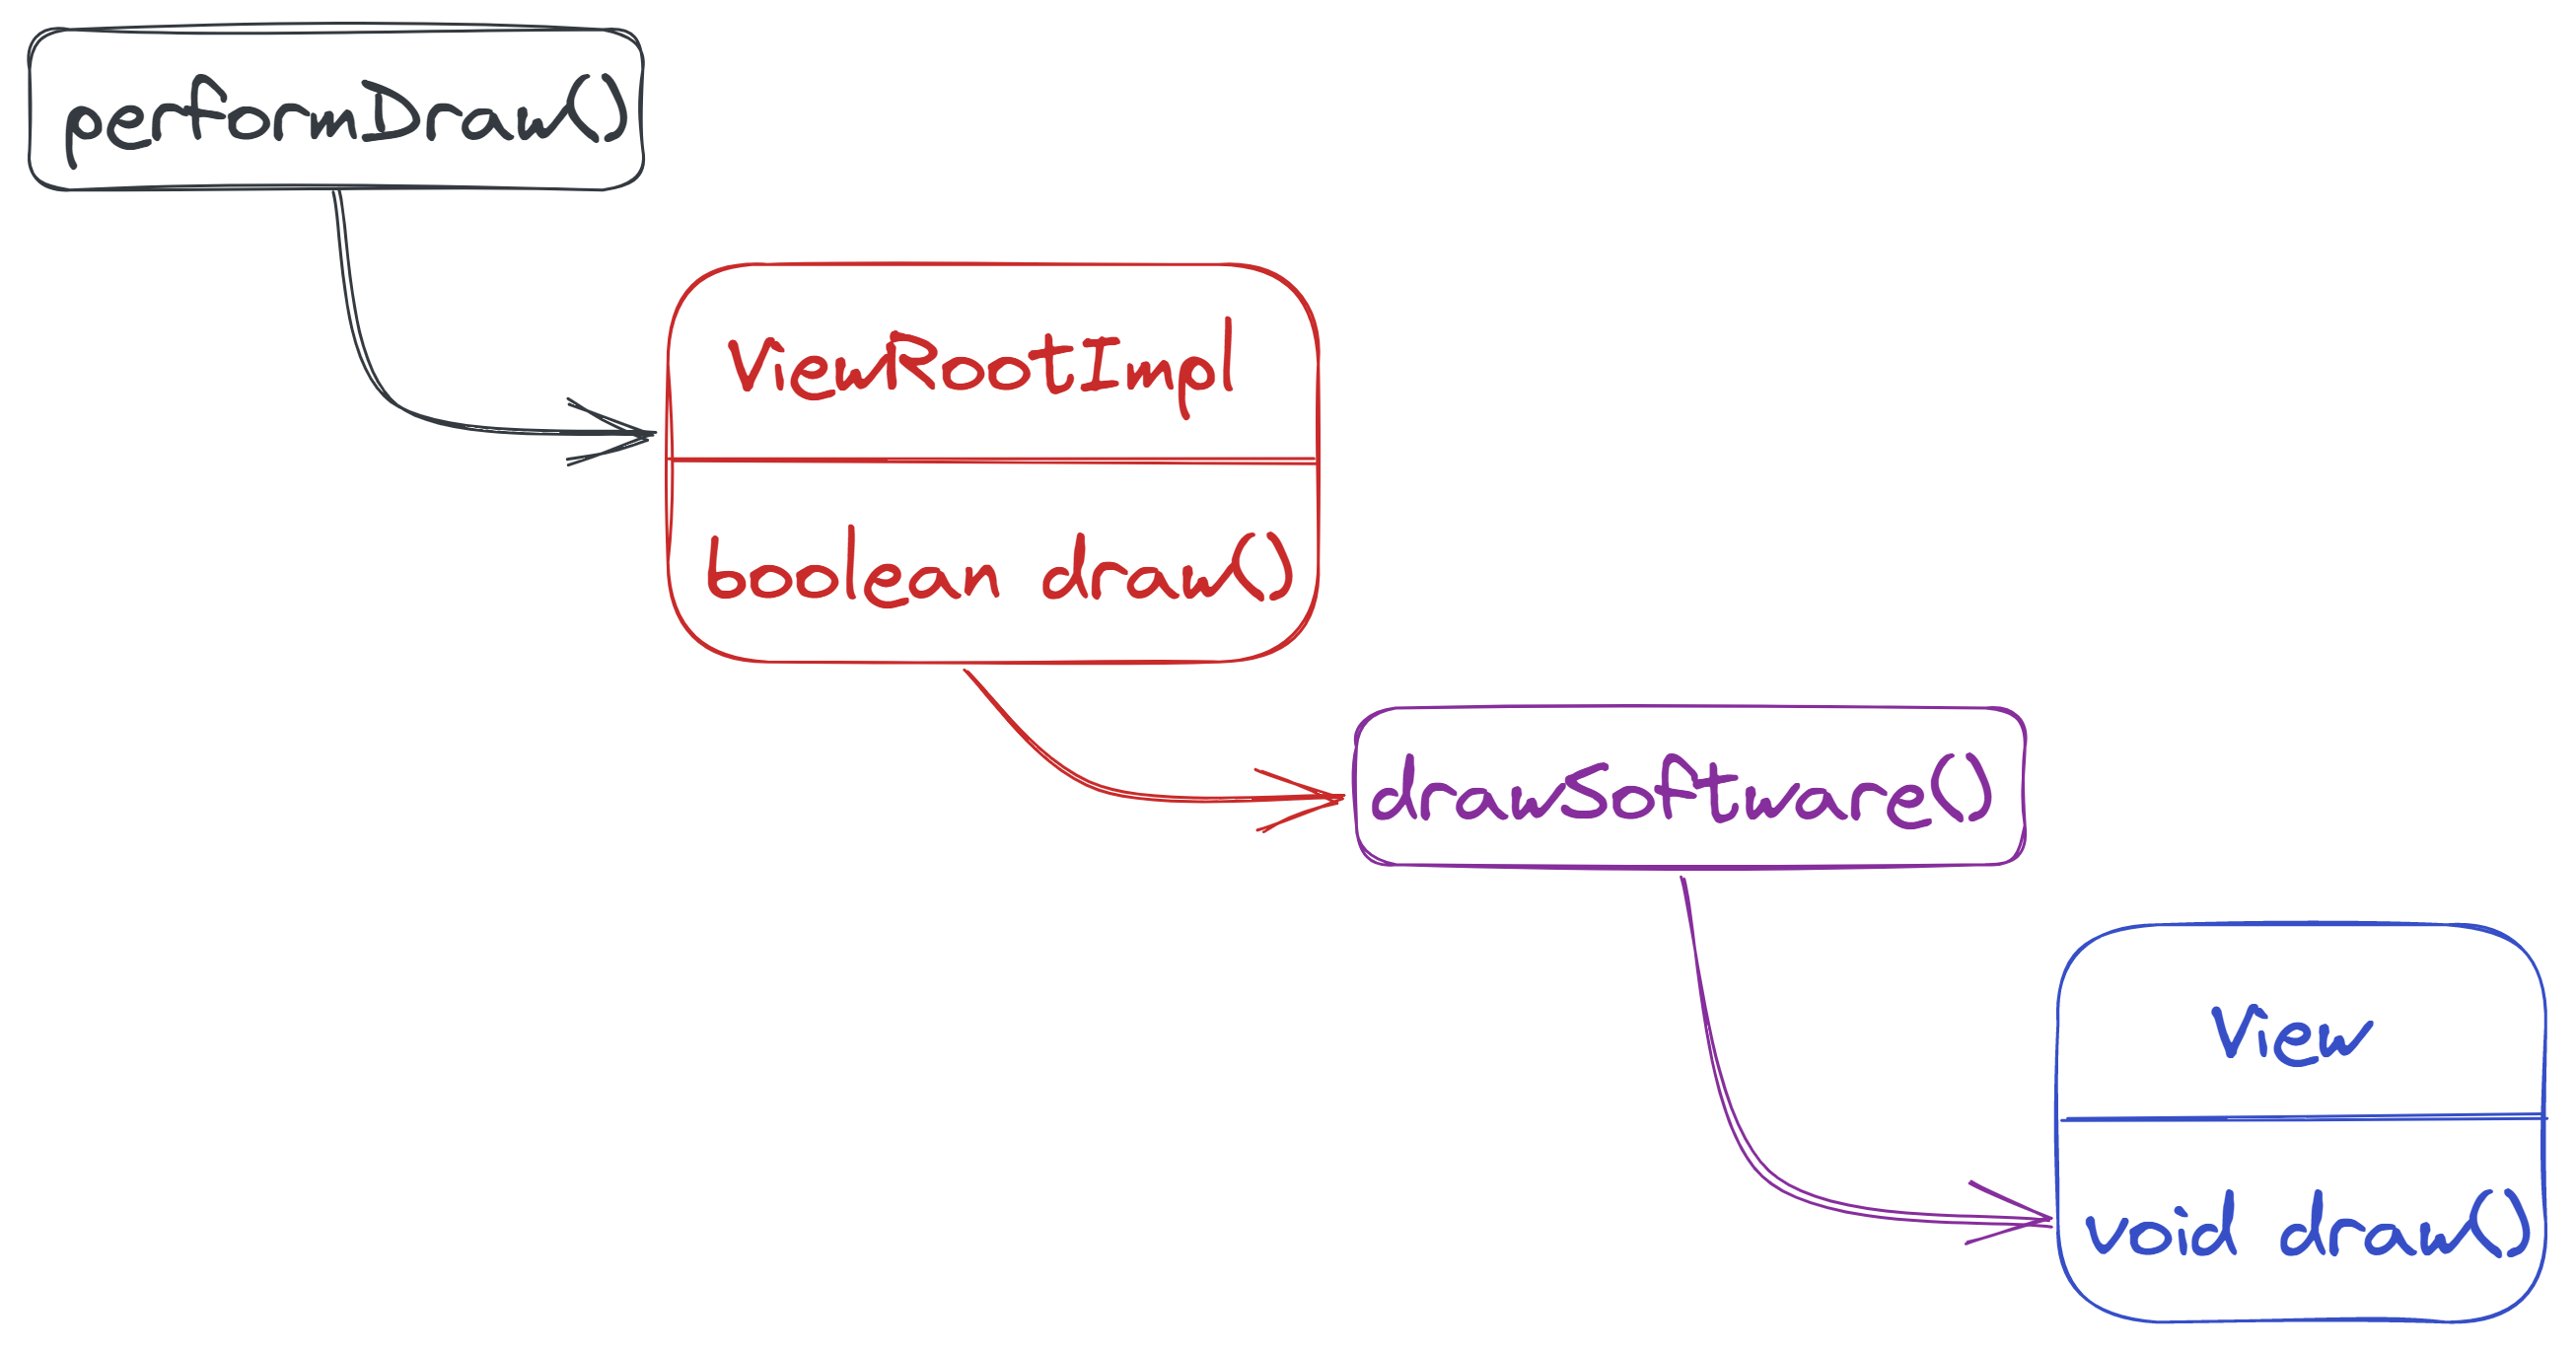
Draw流程
源码分析
点进 View 的 draw() 方法的源码,我们首先看方法的注释。方法的注释大意是说:
- 在调用此绘制方法之前,需要已经完成了所有视图的
layout流程; - 而在实现一个自定义 View 的时候,要重写实现
onDraw()方法,而不是draw()这个方法; - 如果确实需要重写此方法(
draw()),请调用超类版本(surper)。
再次往下面查看,我们会发现方法内部还有一段注释,该注释写明了 Draw 流程的每个步骤。我们翻译为中文是下面这样子。
- 绘制背景
- 如果有必要,保存
canvas层以准备逐渐淡出绘制的内容(可以不执行) - 绘制 View 的内容
- 绘制子 View 的内容
- 如果有必要,绘制 View 的渐变淡出边缘(类似阴影效果)和修复层级(可以不执行)
- 绘制装饰,例如滚动条
- 如果有必要,绘制默认的焦点高亮显示(可以不执行)
上面的7个步骤中,他们的执行顺序是固定的,且其中的 2 3 7 不是必要执行的步骤。下面的代码省略了一段包含全部步骤的详细执行代码,感兴趣的同学可以点击查看。下面我们就逐个查看必要执行的步骤执行了什么。
/**
 * Manually render this view (and all of its children) to the given Canvas.
 * The view must have already done a full layout before this function is
 * called.  When implementing a view, implement
 * {@link #onDraw(android.graphics.Canvas)} instead of overriding this method.
 * If you do need to override this method, call the superclass version.
 *
 * @param canvas The Canvas to which the View is rendered.
 */
@CallSuper
public void draw(Canvas canvas) {
    final int privateFlags = mPrivateFlags;
    mPrivateFlags = (privateFlags & ~PFLAG_DIRTY_MASK) | PFLAG_DRAWN;

    /*
     * Draw traversal performs several drawing steps which must be executed
     * in the appropriate order:
     *
     *      1. Draw the background
     *      2. If necessary, save the canvas' layers to prepare for fading
     *      3. Draw view's content
     *      4. Draw children
     *      5. If necessary, draw the fading edges and restore layers
     *      6. Draw decorations (scrollbars for instance)
     *      7. If necessary, draw the default focus highlight
     */

    // Step 1, draw the background, if needed
    int saveCount;

    drawBackground(canvas);

    // skip step 2 & 5 if possible (common case)
    final int viewFlags = mViewFlags;
    boolean horizontalEdges = (viewFlags & FADING_EDGE_HORIZONTAL) != 0;
    boolean verticalEdges = (viewFlags & FADING_EDGE_VERTICAL) != 0;
    if (!verticalEdges && !horizontalEdges) {
        // Step 3, draw the content
        onDraw(canvas);

        // Step 4, draw the children
        dispatchDraw(canvas);

        drawAutofilledHighlight(canvas);

        // Overlay is part of the content and draws beneath Foreground
        if (mOverlay != null && !mOverlay.isEmpty()) {
            mOverlay.getOverlayView().dispatchDraw(canvas);
        }

        // Step 6, draw decorations (foreground, scrollbars)
        onDrawForeground(canvas);

        // Step 7, draw the default focus highlight
        drawDefaultFocusHighlight(canvas);

        if (isShowingLayoutBounds()) {
            debugDrawFocus(canvas);
        }

        // we're done...
        return;
    }

    ...//源码此处编写了一个完整的程序例程,包括了前面省略的第二步和第5步。由于篇幅原因,此处省略,大家可以点击参考处的详细链接查看
}
首先查看 step1 的 drawBackground() 方法,在下面的注释1处,我们可以其对偏移量进行了判断,当偏移量为0的时候,就直接绘制;当偏移量不为0的时候,我们先进行偏移再执行背景的绘制。注意此处执行的 draw 方法是在 Drawable 里面的。
/**
 * Draws the background onto the specified canvas.
 *
 * @param canvas Canvas on which to draw the background
 */
@UnsupportedAppUsage
private void drawBackground(Canvas canvas) {
    final Drawable background = mBackground;
    if (background == null) {
        return;
    }
    setBackgroundBounds();
    ...
    final int scrollX = mScrollX;
    final int scrollY = mScrollY;
    if ((scrollX | scrollY) == 0) {//1
        background.draw(canvas);
    } else {//2
        canvas.translate(scrollX, scrollY);
        background.draw(canvas);
        canvas.translate(-scrollX, -scrollY);
    }
}
然后我们看 step 3 的 onDraw() 方法,我们发现这是个空实现的方法,在注释处标注了需要自定义 View 的时候实现它。
/**
 * Implement this to do your drawing.
 *
 * @param canvas the canvas on which the background will be drawn
 */
protected void onDraw(Canvas canvas) {
}
我们继续看 step 4 的 dispatchDraw() 方法,这也是一个空方法。注释处标明:需要在派生类(继承类)绘制了自身之后,绘制子类之前,对该方法进行重写调用。在 ViewGroup 中,有对这个方法进行重写,我们可以继续到 ViewGroup 查看。
/**
 * Called by draw to draw the child views. This may be overridden
 * by derived classes to gain control just before its children are drawn
 * (but after its own view has been drawn).
 * @param canvas the canvas on which to draw the view
 */
protected void dispatchDraw(Canvas canvas) {

}
在 ViewGroup 中,我们在下列注释1处看到 dispatchDraw() 方法对子元素执行了遍历,在注释2 3 处,可以看到其对每一个子 View 都执行了 drawChild() 方法。
@Override
protected void dispatchDraw(Canvas canvas) {
    ...
    for (int i = 0; i < childrenCount; i++) {//1
        while (transientIndex >= 0 && mTransientIndices.get(transientIndex) == i) {
            final View transientChild = mTransientViews.get(transientIndex);
            if ((transientChild.mViewFlags & VISIBILITY_MASK) == VISIBLE ||
                transientChild.getAnimation() != null) {
                more |= drawChild(canvas, transientChild, drawingTime);
            }
            transientIndex++;
            if (transientIndex >= transientCount) {
                transientIndex = -1;
            }
        }

        final int childIndex = getAndVerifyPreorderedIndex(childrenCount, i, customOrder);
        final View child = getAndVerifyPreorderedView(preorderedList, children, childIndex);
        if ((child.mViewFlags & VISIBILITY_MASK) == VISIBLE || child.getAnimation() != null) {
            more |= drawChild(canvas, child, drawingTime);
        }
    }
    ...
}
而点开 drawChild() 方法,我们发现它是直接调用了子 View 中 boolean 类型的 draw() 方法(并非我们上文提到的执行最终绘制的 draw() 方法)
/**
 * Draw one child of this View Group. This method is responsible for getting
 * the canvas in the right state. This includes clipping, translating so
 * that the child's scrolled origin is at 0, 0, and applying any animation
 * transformations.
 *
 * @param canvas The canvas on which to draw the child
 * @param child Who to draw
 * @param drawingTime The time at which draw is occurring
 * @return True if an invalidate() was issued
 */
protected boolean drawChild(Canvas canvas, View child, long drawingTime) {
    return child.draw(canvas, this, drawingTime);
}
我们继续查看 View 中 boolean 类型的 draw() 方法,在注释1处检测是否无缓存,如果无缓存就直接执行绘制;如果有缓存,就在注释2处利用缓存显示。
/**
 * This method is called by ViewGroup.drawChild() to have each child view draw itself.
 *
 * This is where the View specializes rendering behavior based on layer type,
 * and hardware acceleration.
 */
boolean draw(Canvas canvas, ViewGroup parent, long drawingTime) {
	...
    if (!drawingWithDrawingCache) {//1
        if (drawingWithRenderNode) {
            mPrivateFlags &= ~PFLAG_DIRTY_MASK;
            ((RecordingCanvas) canvas).drawRenderNode(renderNode);
        } else {
            // Fast path for layouts with no backgrounds
            if ((mPrivateFlags & PFLAG_SKIP_DRAW) == PFLAG_SKIP_DRAW) {
                mPrivateFlags &= ~PFLAG_DIRTY_MASK;
                dispatchDraw(canvas);
            } else {
                draw(canvas);
            }
        }
    } else if (cache != null) {//2,有缓存
        mPrivateFlags &= ~PFLAG_DIRTY_MASK;
        if (layerType == LAYER_TYPE_NONE || mLayerPaint == null) {
            // no layer paint, use temporary paint to draw bitmap
            ...
        } else {
            // use layer paint to draw the bitmap, merging the two alphas, but also restore
            ...
        }
    }
	...
    return more;
}
最后,我们来看 step 6 的 onDrawForeground() 方法,我们可以在下方的注释1处可以看到,它绘制的是 ScrollBar 类型的装饰。并在注释2处调用 foreground.draw() 方法绘制视图内容的上层视图。
/**
* Draw any foreground content for this view.
*
* <p>Foreground content may consist of scroll bars, a {@link #setForeground foreground}
* drawable or other view-specific decorations. The foreground is drawn on top of the
* primary view content.</p>
*
* @param canvas canvas to draw into
*/
public void onDrawForeground(Canvas canvas) {
onDrawScrollIndicators(canvas);
onDrawScrollBars(canvas);//1
final Drawable foreground = mForegroundInfo != null ? mForegroundInfo.mDrawable : null;
if (foreground != null) {
...
foreground.draw(canvas);//2
}
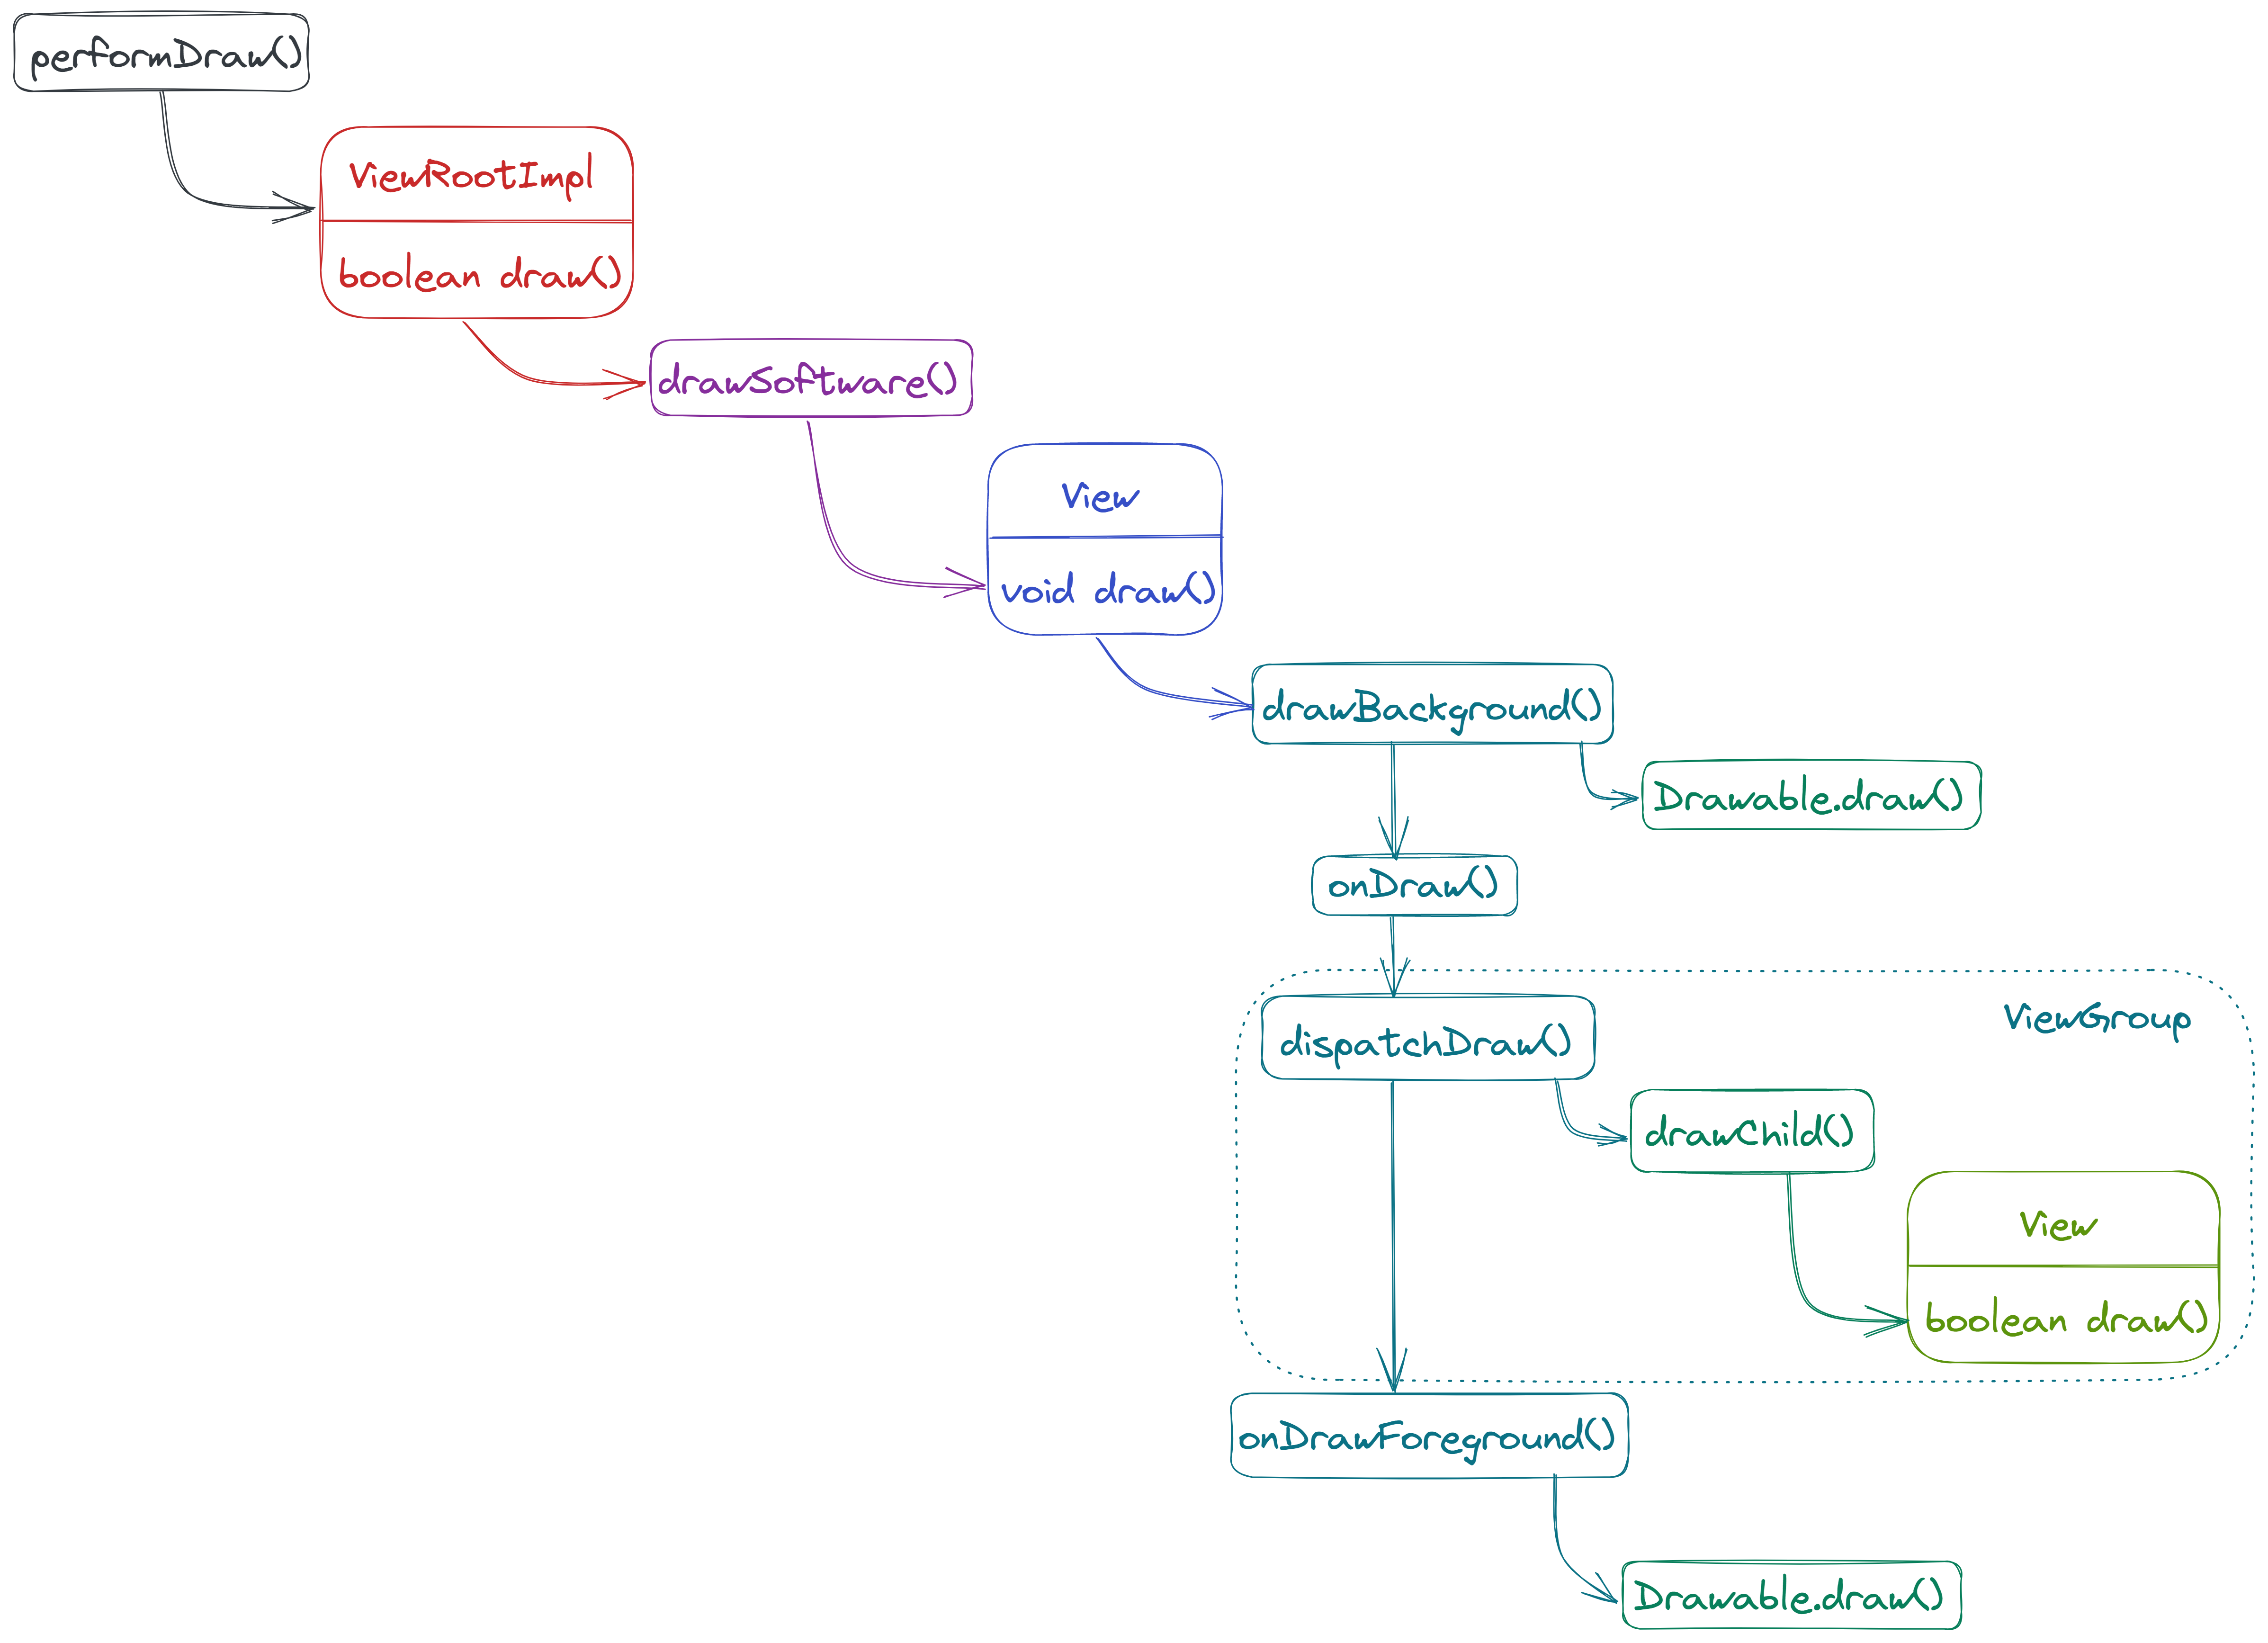
}流程图展示
上文的源码分析到此结束了,笔者按照上面的流程整理出来了一张 Draw 方法的流程图,希望可以帮助大家更好的理解。
参考
ViewRootImpl.java - Android Code Search
View.java - Android Code Search Draw 流程的详细链接
ViewGroup.java - Android Code Search
《Android进阶之光》
《Android开发艺术探索》